In scope
- Your own track, uploaded or picked from From My Music.
- Eleven moving templates in circle and flat shapes.
- Three aspect ratios, three resolutions and two frame rates.
- Logo, song title, artist name and lyrics layers.
Editor, not one-shot
An AI music video editor gives you a project to work on rather than a single render. On MusicCreator you open the Music Visualizer from the AI Music Video page, choose one of 11 moving templates, then set the frame, swap layers and add lyrics before you export. Your track drives the motion; you decide what sits on top of it.
Use audio you own or have the rights to.
The workspace has four zones, and each one answers a different question about your video. Knowing where they are saves you from hunting for a setting halfway through a project.
The project starts as Untitled with a pencil beside it, so rename it first. My Videos and Export sit on the right.
The large frame shows the chosen template, its background and the moving visualizer, with a play button in the centre.
Four icon tabs head a long panel that runs from Template and Music down to Images, Logo, Text and Lyrics.
Along the bottom, a time readout, zoom controls and a music lane show where you are in the track.
Choose Template opens before anything else, with five tabs: All, Neon, LoFi, Anime and Spectrum. Every card names its visualizer shape, so the grid below sorts all 11 templates two ways at once: by how the visualizer moves and by the look it belongs to.
| Visualizer shape | Neon | LoFi | Spectrum | Anime | Total |
|---|---|---|---|---|---|
| Circle solid | Lucky Clover | Magma, Chromatic, Snowflake | none | none | 4 |
| Circle point | Counting Stars, Seven Suns, Pinky Pop | none | none | none | 3 |
| Flat solid | none | none | Datascape, Range of Fire | none | 2 |
| Flat bar | none | none | Jungle Cat, Prismatic Shard | none | 2 |
| Templates per category | 4 | 3 | 4 | 0 | 11 |
Read across a row to see every template that moves the same way, or down a column to stay inside one look. The Anime tab showed no templates on 2 November 2026, so treat it as a tab to check again later rather than a style you can plan around.
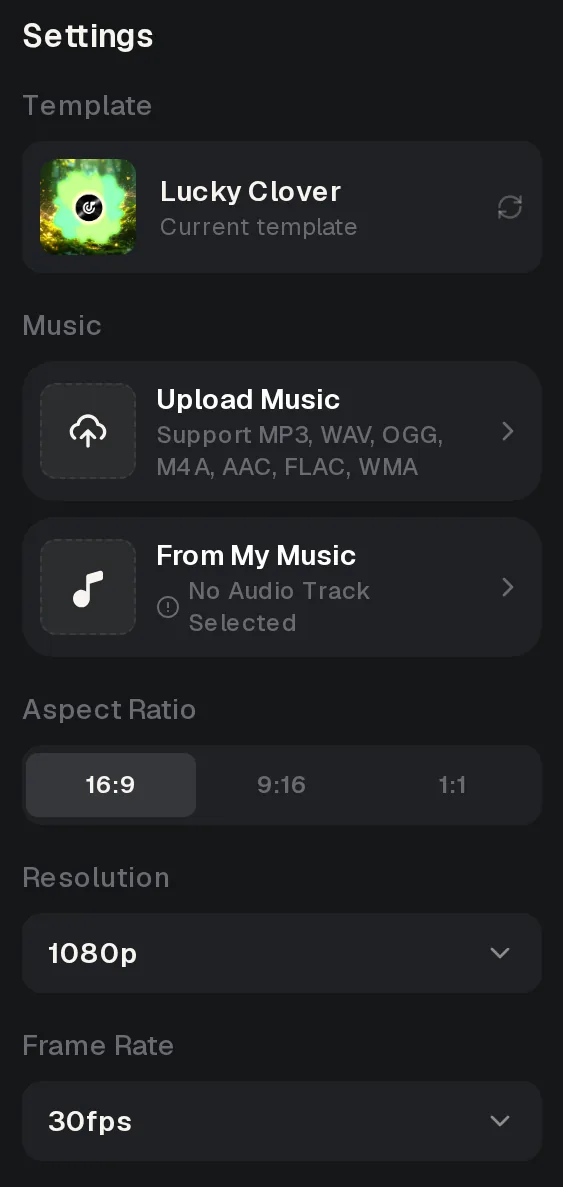
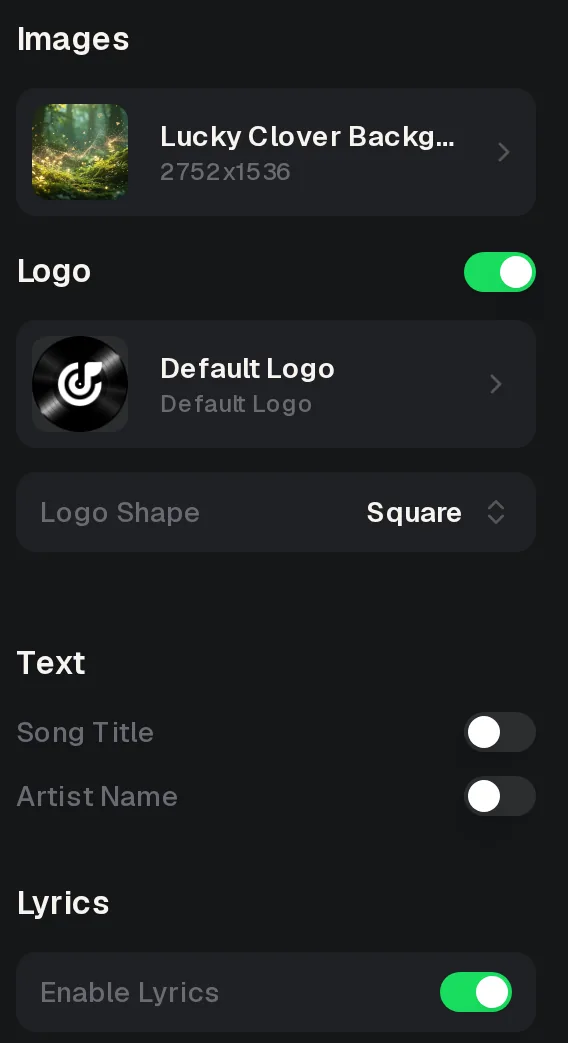
Below Template and Music, the panel keeps going. These two captures show it in order with Lucky Clover loaded: the frame settings first, then the layers, with lyrics switched on.
A single often needs more than one video: a wide one for a video channel and a vertical one for short clips. Work through the panel in the same order each time.
Settle the look before you touch any layer. Changing template late means checking every layer again, because the background and visualizer come as a set.
Write down where each version will be posted before you begin, so you know how many shapes to export and which layers each one needs. Keep the master audio file at hand. Music takes an upload in MP3, WAV, OGG, M4A, AAC, FLAC or WMA, or a song from From My Music if you made it on MusicCreator.
The editor is built around templates, so plan with that in mind.
Open the AI Music Video page. It lists four formats: Music Visualizer and Photo Video each have a Create button, while Story Music Video and Singing Video are marked Coming Soon. Choose Create under Music Visualizer to reach the editor. It opens with Choose Template on top, so pick a template first; the preview, the background image and the rest of the side panel then fill in around it, ready for your track.
Yes. The Template card at the top of Settings shows the current one, such as Lucky Clover, with a swap icon beside it that brings the template choice back. Because the background image travels with the template, a swap also changes the picture behind your visualizer. After switching, look again at the logo, the title and artist text, and the lyrics, and preview each aspect ratio you plan to post, since the new background may sit differently behind them.
Match it to where the video will play: 16:9 for wide players on desktops and TVs, 9:16 for vertical feeds on phones and 1:1 for square posts. If you need more than one shape for the same release, finish the first version, then change Aspect Ratio and preview again before the next export. Resolution and Frame Rate sit right below, so it is easy to check all three frame settings together each time.
Switch on Enable Lyrics at the bottom of the side panel. Two ways in appear: Add Lyrics, for typing the lines yourself, and Auto Detect, which looks for the words in your track. Lyrics Style starts at Classic and lets you pick another look. Each line lands in the Lyrics List, which says No lyrics yet until you add some, and Clean All clears the list if you want to start over. Read every line against the song before you export.
Upload Music lists MP3, WAV, OGG, M4A, AAC, FLAC and WMA, which covers most masters and bounces from a home studio. If you made the song on MusicCreator, From My Music lets you choose it without downloading and uploading it again; until you pick one, the card reads No Audio Track Selected. Whichever route you take, use only recordings you own or have the rights to put in a video.
Pick a template, set the frame for where it will play, then add your logo, title and lyrics on top of your own track.